DYSEKT docs · Start
The interface
A tour of DYSEKT's window, from the top bar to the edit tabs, and how edits apply to one slice or all of them.
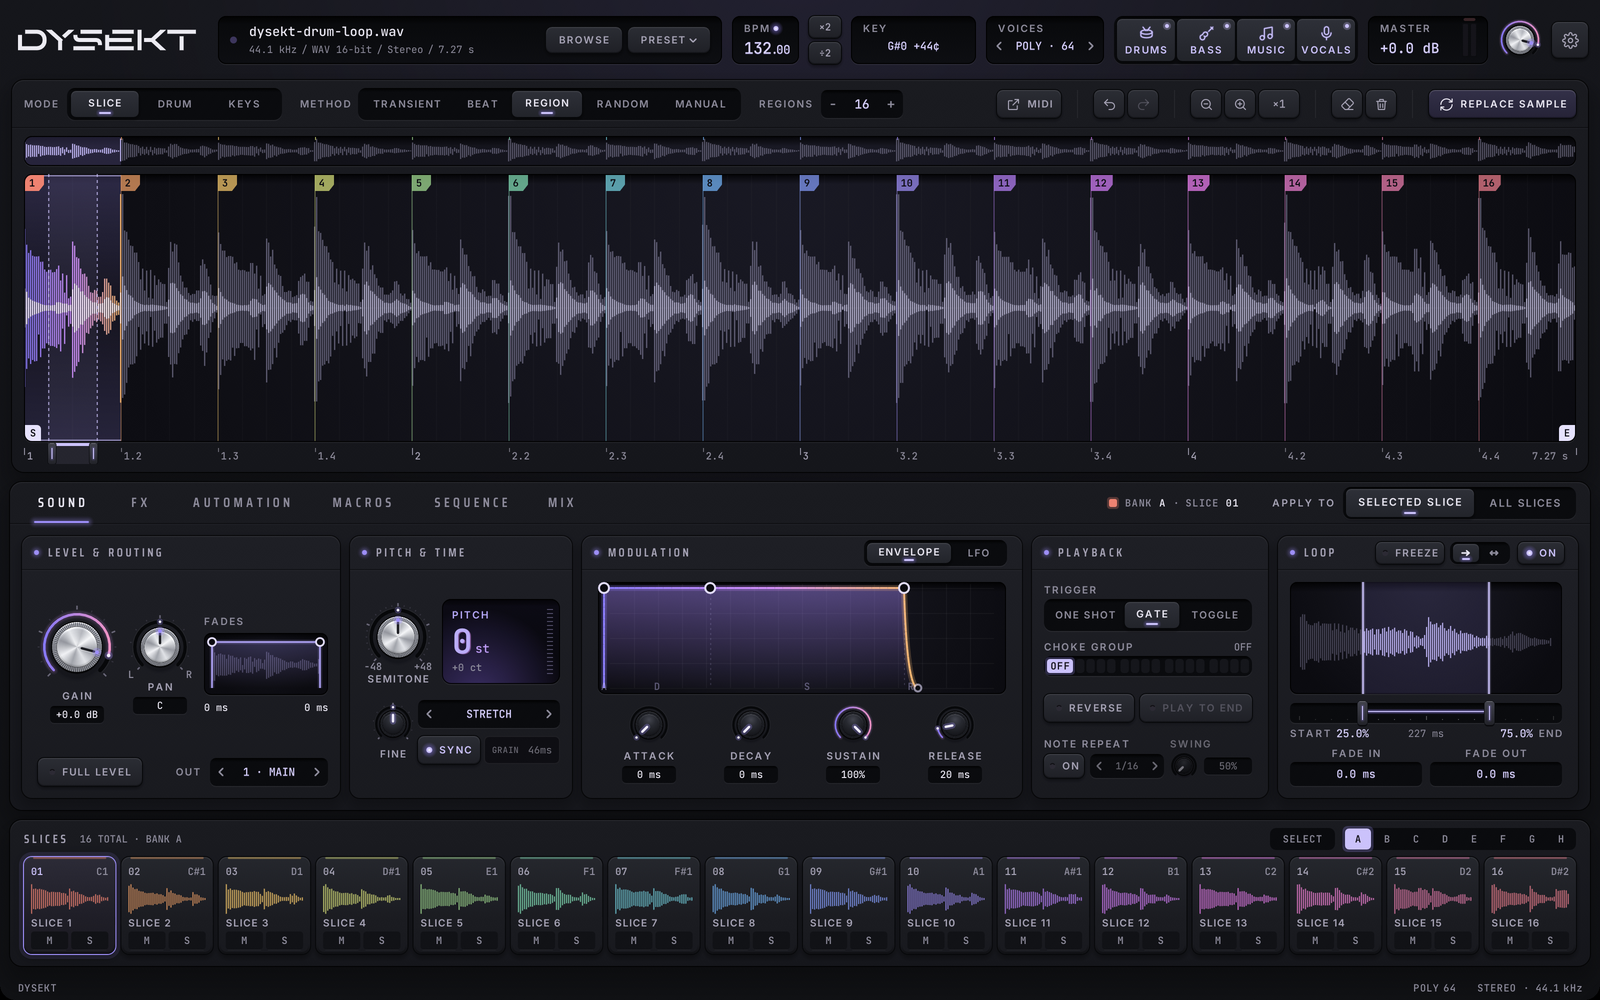
#The top bar
| Control | What it does |
|---|---|
| Sample name | The loaded file. Hover to see its folder. Double-click to load or replace the sample. |
| BROWSE | Opens the browser: your sample folders, stars, recent files and progressions. See Browser. |
| PRESET | Load or save the whole instance as a preset. LOAD PRESET also opens MPC programs, Maschine kits and sounds, SoundFonts and SFZ files. See Presets. |
| SYNC | Follows the host tempo. Shows and sets the selected slice, pad or zone. |
| BPM | The sample's tempo. Drag to change it, or double-click to type. The ×2 and ÷2 keys treat the sample as twice or half the detected tempo. |
| KEY | The musical key detected from the sample. |
| VOICES | Poly (up to 64 voices) or mono, and the polyphony limit. |
| MASTER | The instrument's output level. |
| Output meter | Peak level. The top light shows clipping; click it to reset. |
| SETTINGS | Preferences, the licence, About and the changelog. See Settings. |
#Modes
The MODE switch chooses what DYSEKT is:
- SLICE: one sample, cut into slices. See Slice mode.
- DRUM: a sample on each pad. See Drum mode.
- KEYS: zones mapped across the keyboard. See Keys mode.
Each mode keeps its own content, so you can switch between them without losing anything.
#The waveform
The middle of the window shows the sample, or the selected pad or zone.
- Zoom with the mouse wheel, a trackpad pinch, or the + and − keys. Shift with the wheel scrolls sideways.
- The overview strip shows the whole sample. Drag it to move the zoomed view.
- FOLLOW: when zoomed in, the view moves to the slice that's playing. Turn it off to keep the view where you put it.
- Vertical zoom enlarges quiet audio on screen only; it doesn't change the sound. Click to step up; right-click or Option-click to reset.
- Undo and redo (Slice mode: slice edits; Drum mode: trims of the selected pad). Also Cmd+Z, and Cmd+Shift+Z or Cmd+Y to redo, while the DYSEKT window has focus.
#Pads and the keyboard
Below the waveform:
- In Slice and Drum modes, 16 pads show one bank. The bank keys A to H show pads 1–16, 17–32 and so on up to 128.
- In Keys mode, a keyboard shows the zones. Coloured keys show each zone's range. The OCTAVE field shifts the visible range.
#Edit tabs
The panel at the bottom edits the selected slice, pad or zone:
| Tab | What's on it |
|---|---|
| SOUND | Level, pitch, envelope, LFO, playback and loop. See Sound settings. |
| FX | The effect chain. See Effects. |
| AUTOMATION | Controls you expose to your DAW's automation. See Macros and automation. |
| MACROS | Eight knobs that each move many settings at once. |
| CHORDS | Keys mode only. Chord memory and progressions. See Chords. |
| ARP | Keys mode only. The arpeggiator. See Arpeggiator. |
| SEQUENCE | Drum and Slice modes. The step sequencer and the slice sequencer. See Sequencers. |
| MELODY | Keys mode only. Melodies from a scale. See Melody. |
| MIX | A channel strip for every pad, slice or zone, and the master. See Mixer. |
#Selected or all
The APPLY TO switch decides what an edit changes:
- SELECTED (SELECTED SLICE, PAD or ZONE): edits change the selected one only.
- ALL (ALL SLICES, PADS or ZONES): edits change every one.
With ALL selected, a control shows MIXED where the slices differ. On the SOUND tab:
- A plain drag sets them all to the same value.
- An Option-drag moves them all by the same amount, keeping their differences.
- Double-click a value to type one number for all of them.
On the FX tab, the same switch chooses between the selected slice's own chain and the MASTER chain on the instrument's output.
You can choose which scope new sessions start in with DEFAULT EDIT SCOPE in Settings.
#Typing and resetting values
- Drag a knob or field up and down to change it. Hold Shift while dragging for fine steps.
- Double-click a value readout to type a number.
- Right-click or double-click resets many controls to their default. The hover help says which.