DYSEKT docs · Modes
Keys mode
Map samples across the keyboard as zones, with key and velocity ranges and root notes, or open SoundFonts, SFZ, MPC keygroups and Maschine instruments.
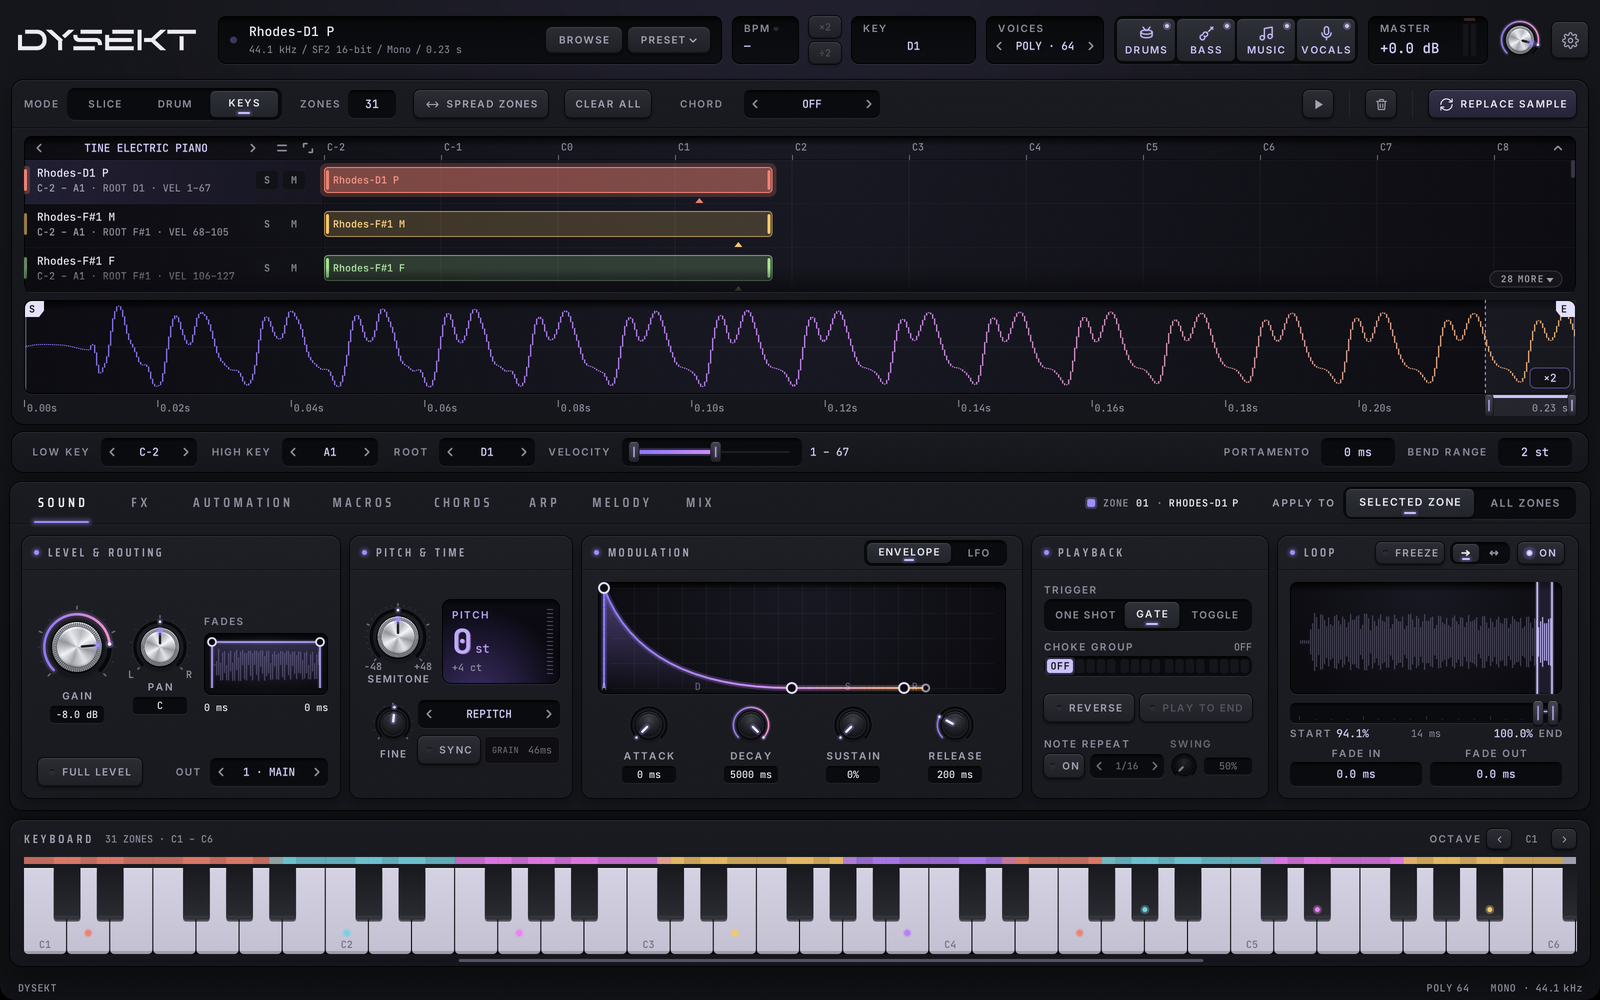
#Zones
A zone is one sample with a key range, a velocity range and a root note. Keys mode holds up to 128 zones.
- LOAD SAMPLE in the top bar loads a file into the selected zone; pick several and each of the others becomes a new zone.
- Double-click an empty row of the zone list to add samples.
- CLEAR ALL removes every zone. The files stay on disk.
Right-click a zone in the list for its menu:
- CUT, COPY and PASTE: pasting onto a zone replaces its sound and keeps its key range. PASTE AS NEW ZONE adds it as a zone of its own. A pad copied in Drum mode pastes across the whole keyboard, rooted on its own pitch.
- DELETE removes the zone.
- SEND TO SLICE loads the zone's sample into Slice mode, ready to slice. SEND TO DRUM puts it on the first empty pad.
Right-click below the last zone to paste one in.
SPREAD ZONES lays out the zones for you:
- Equal: even splits across the keyboard in list order, each root in the middle of its zone.
- Around root keys: for multisample sets. Each sample keeps its root, and the zones split between them.
#Show or fold the zones
The zones sit above the waveform, in one of two views:
- Shown: the full zone list, one row per zone with its name, key range, root and velocity range, beside the zone map. This is the view in the screenshot above.
- Folded: a single strip with every zone side by side in its colour, so the waveform gets more room, as in the screenshots on Chords and Arpeggiator.
To switch:
- Click the arrow at the right end of the zone header. Its hover help says FOLD ZONES or SHOW ZONES.
- Double-click the folded strip to show the full list again.
DYSEKT saves the view with your project.
When there are more zones than fit, the rows fade out at the edge, and a label at the bottom right says how many more there are (4 MORE). Scroll with the mouse wheel or trackpad, click the label to bring the next zone into view, or use the arrow keys (below).
#Full view and compact rows
Two keys at the right end of the zone list's header help with big instruments, such as one with many velocity layers:
- Full zone view (the corner arrows): the zone list fills the editor, in place of the waveform and the SOUND / FX deck. The selected zone's controls sit in a row just above the keyboard, which stays, so you can play and watch which zones light up. Click it again, or press Esc, to go back.
- Compact rows (the lines): half-height rows, twice as many in view. Each row shows the zone's name and one fact: its velocity range for a velocity layer (VEL 50–65), otherwise its key range. The map shows the keys; the fields row shows the root and the rest.
Both are saved with your project, and work together: full view with compact rows shows about 27 zones at once.
#Step through zones
With a zone selected, ↑ and ↓ select the previous and next zone, and Home and End the first and last. The list scrolls to keep the selected zone in view. In a DAW, click in DYSEKT's window first, so the keys reach it.
#The zone list
- Click a zone to select it.
- Drag a name to reorder.
- S solos and M mutes a zone.
#The zone map
- Drag a zone to move it, or drag its edges to set its range.
- Where zones overlap, click again to step through them.
- Double-click an empty row to add samples.
The panel under the waveform holds the selected zone's settings. LOW KEY, HIGH KEY and ROOT change with their arrows or by dragging. Right-click ROOT, then click a key on the keyboard to set the root to that key. VELOCITY sets the velocity range: drag its handles.
#Trim and preview
The waveform shows the selected zone, with a time ruler in seconds underneath. KEY in the top bar shows the pitch DYSEKT hears in the selected zone's sample, named the way DYSEKT names notes (middle C is C3). Drag S and E to trim it. Click while it plays to skip. With LOOP on, the loop range sits on the ruler: drag its ends or its middle. PREVIEW plays the selected zone at its root note; click again to stop.
#The keyboard
Click the on-screen keyboard to play. Coloured keys show each zone's range, and keys light as notes play, whether from your MIDI controller, your DAW or the mouse. OCTAVE shifts the visible range; the mouse wheel scrolls it too.
#Mono, glide and pitch bend
- VOICES chooses poly or mono.
- PORTAMENTO sets the glide time between notes in mono.
- BEND RANGE sets the pitch-bend wheel range in semitones.
#SoundFonts and SFZ
Open or drop an .sf2 or .sfz file and its whole key map loads, ready to play. Opening one from Slice or Drum switches to Keys for you.
- A SoundFont with several presets opens a preset list. Type to jump to a name, use ↑ ↓ and Return to pick one.
- While a SoundFont is loaded, the zone list header shows the preset name with ‹ › arrows to step through its presets. Click the name for the list.
- Choosing a preset replaces all zones.
More on what comes across in Importing and file formats.
#Chords, progressions and the arp
The CHORDS selector in the Keys toolbar decides what your keys do:
| Choice | Each key plays… |
|---|---|
| OFF | its own note |
| MEMORY | one stored chord, from that key |
| PROGRESSION | its chord from a progression |
| ARP | an arpeggio of what you hold |
Only one is on at a time. See Chords and progressions and Arpeggiator.